Thursday, March 8, 2012

It's Hot Up In This Kitch

I have gotten really good at cooking dinner with very little, on little money. This is partially because I have a limited budget and therefore I'm forced to be inventive, and partially because of the inevitable challenge that arises when the groceries start to run low. The most challenging part is finding something healthy and delicious from whatever is left in the freezer. I usually keep a couple of bags of frozen broccoli on hand, as well as frozen carrots, mushrooms, zucchini-- whatever I think will come in handy. I'll post freezing directions at the bottom of the post.

This is my latest concoction: Chicken and Noodles with Mushroom Sauce

You'll need
2 chicken breasts
whatever seasoning you like
¼ cup chopped white onions
1 clove garlic, smashed
2 Tbsp olive oil
2 cups egg noodles
1 cup mushrooms, sliced
1 can Cream of Mushroom
1 Tbsp honey

First start the water for the noodles on medium-high. While the water heats up, season your chicken and place in a skillet with 1 tbsp olive oil over medium heat.

In a small saucepan, drizzle 1 tbsp olive oil and start to saute the onion and garlic. You want them to get nice and golden.

Cook the noodles as directed and keep an eye on the chicken, turning over to make sure you don't burn it (like I did-- oops). When the noodles are done, drain and drizzle with a little olive oil to keep from sticking. 


When your onions are nice and golden, add the sliced mushrooms and cook until soft. 


Add the Cream of Mushroom soup and the honey, and stir well to combine. Set the heat to low and stir often to keep the sauce from sticking to the pan.

When the chicken is done, shred it and place it in the same pot as the cooked noodles. When your sauce is nice and thick (it will be a little darker from the onion glaze) pour it in with the noodles and chicken, too. Stir everything up and enjoy!


For frozen carrots and frozen mushrooms:
Chop or slice the carrots and place individual pieces on a plate and place in the freezer. Once the pieces are frozen, place in freezer bags and label with the date. Use within 3 months. When you need to use the pieces, let them thaw for about 30 minutes before cooking.

For frozen zucchini:
Slice or shred as needed and place into freezer bags. NOTE: Frozen zucchini works well in soups and baked dishes, but it's not quite as impressive sauteed.

Wednesday, March 7, 2012

Small, Dark and Handsome

It was a dark and stormy night—literally—in 1995 when I found myself in a car with my mother, headed to the SPCA. I was wearing my favorite dress, a pink and white tie-dye cotton dress. I wore that dress every chance I got. We braved the weather that night because there was a kitten waiting for me, a solid black male kitten who was old enough for me to take home. I was 6 years old, so my memory is a little foggy on details, but I remember sitting in the back seat next to one of those cardboard crates they use for adoptions, and he wouldn't stop meowing! It was thundering a lot but I couldn't pay attention because inside that little cardboard crate was someone who would change my life.

When we got home, the dogs (who were not much shorter than I was) were eager to sniff the box. Our other cat, Gypsy, was disinterested. She probably knew that this new kitten would be a daily annoyance to her well-established turf. My mom and I carried the crate back to her bathroom, where we opened it up so that Bentley could see his first glimpses of his new home.

He was so tiny! I remember sitting there in the small bathroom with the pale green tiles, terrified that he would claw my legs as he sat up on my lap. He was extremely curious. Right away we saw how interested he was in the shower, something that never changed. Even in his last days, he loved getting in the shower while it was running, and he, weirdly, loved to drink the water that gathered around the drain after it was turned off. Bentley also loved scooping the water out of the dogs' water bowls and playing with the water in the toilets. He was an absolute mess.

In a short time Annie was born and Bentley became her personal stylist. He loved to lick her head and he would swirl her hair up into the funniest little curly-cues. This was also the time when we discovered that any loose ribbons left out would be eaten by Bentley and appear later in the litter box. It was quite colorful...

I remember how every time we went on family trips he would love to climb into my suitcase while we were packing, and when we finally got home, he trotted to the door to meow loudly and demand we make up for all the attention he missed out on while we were gone.

He said good morning to me every day, and he laid with me for a few minutes every night before I went to sleep before he would leave and roam around the house in the dark during the night. In the early morning hours he would always find his way into my parents' room where he would snuggle with my mom, sometimes on her head.

Bentley never scratched or bit or hissed, unless he was playing with the other pets, or growling at the mailman. He only had love for us. He was the sweetest little cat anyone has ever known, and he was my first true love.


When my mom and I took him to the vet on Monday, March 5, 2012, it was the hardest thing I have ever had to do, but I also knew that it was the right thing for him. It would have been so easy to be selfish and keep him around longer for my benefit, but it would have caused him pain and shame and in the end, it would have caused more hurt than good for everyone. Being able to hold him close and tell him I love him, being able to let him feel loved and special every second of his life, was both the most painful thing and the greatest gift.

I'd always thought about his place in my life as a special place that no other animal or person can every occupy. But now I realize that it was my place in his life that was the greatest gift of all. I'll miss you forever, Bentley.


Saturday, February 18, 2012

Food and Memory

Last night I made stuffed bell peppers for dinner. While this may seem like just another recipe post, there is a story behind this recipe:

As a kid, my mom frequently made a Cuban meal called pico dillo. I'm not actually sure if that's how it is spelled, but either way, it was delicious. It's a mixture of ground beef, garlic, onion, tomato sauce, olives and raisins. It's usually served over rice.

It was my Abuelo's favorite meal, according to my dad. Abuelo has always been my favorite family member. He was always patient and smart. He was so funny. It's from him that I inherited my unending stream of bad puns. When he passed away it was devastating, but I believe he sees me every day.

So last night when I was making stuffed peppers, I realized that the filling was extremely similar to pico dillo. It smelled amazing and the whole time I was cooking, I felt like my Abuelo was with me. This has been an incredibly difficult past year and I am struggling daily to do what I need to do to succeed at school and at work. But last night, feeling close to my Abuelo, everything was a little bit easier.

Here is what you'll need:
2 large bell peppers
½ pound of ground beef
1 tbsp olive oil
1 cup cooked white rice
1 8-oz. Can of tomato sauce
1 large clove garlic, smashed and minced
¼ cup chopped onion
salt


1. Get the rice going. (I cook 1 cup dry rice with 2 cups water in the microwave. I cook it uncovered on High power for 5 minutes, then covered on 50% power for 15 minutes.)

2. While the rice starts, cut off the tops of the bell peppers and take out the seeds. Chop up the good parts of the tops to include in the filling and set aside. Place the peppers in a pot with water that just covers them, and bring the water to a boil. Boil the peppers for 3 minutes. When they're done, set them in ice water for a few seconds, then drain on a paper towel while you make the filling.


3. In a pan, cook the onion, garlic, leftover peppers and ground beef with a tablespoon of olive oil until the meat is cooked through. Season with salt. Pour the tomato sauce in the pan and remove from heat. Once the rice is cooked, you'll put this in the pan, too, and stir everything up until it's mixed well. 


4. Preheat the oven to 350, and place the drained peppers in a shallow baking dish. Fill them up with the filling. Any leftover filling can be set aside for another meal-- it's delicious on its own.

5. Bake the peppers for 20 minutes. When they're done, use tongs to place them on plates, and enjoy!


Sunday, February 5, 2012

Pajamas and Pinterest

I am in love with an airline pilot.

That being said, I spend a lot of time hanging out alone, which is fine with me because I tend to be a huge homebody. Don't get me wrong, I still get dressed and bathe regularly and I have my friends, but I'm perfectly content to hang out at home for 3 days straight. My point is this: once all the reading, the writing and the research is done (the 3 "r"s of higher education!) I have a bit of time on my hands.

Enter: timesuck Pinterest

This website has changed my life. Not in a Celine Dion kind of way-- who! by the way, you can look up and pin on Pinterest! But it has provided me with yet another creative outlet. I have my old lady magazines, my old lady hobbies, and my new interest in cooking, and these things keep me going most of the time. But there's something about having a living, breathing community to share ideas with that is new and exciting. On Pinterest, I can follow my friends and get to know their creative sides. A lot of these friends are people that I wouldn't normally discuss crafts/hobbies/recipes, etc. with because I don't really know what they're into. But now I have an idea and a ready conversation topic. It's pretty cool.

It's also incredibly fun to search for new recipes to try here at home, and to pin ideas and crafts for events like birthdays, baby showers, and weddings, things which usually rise in frequency in one's mid-20s. There are ideas for gardening, ideas for home decoration, and ideas for clothing and apparel that are not only cute, but are sometimes invented and displayed by other normal, everyday people, rather than magazine models. That element of reality is so much more inspiring because I feel that all the cool ideas I see are not manufactured, but real, which means I can try them, too!

Anyway, this is a completely pointless post, and super dorky. But if you haven't already, check out Pinterest. It's very fun and it's a way to brainstorm for yourself, and brainstorm with others. AND. You can do it in your pajamas, as I do 85% of the time. Holler.

Monday, January 23, 2012

Comfort in Stitches

Lately I've been assembling some quilt blocks, working towards a colorful, warm, unique quilt. Each block takes quite a bit of time and precision, and I'd like to share the joy, for those of you interested!

The pattern I adopted and amended originally makes one full-size quilt, from 81 squares (5” x 5”). I'm making a quilt large enough to fit a queen size bed with plenty left over.

You'll need 81 (or more) squares, cut 5”x5”.
You'll also need plenty of strips, cut 1.25” x 7.5”, as well as 1.25” x 8”.
Start by setting up your first 9-square block:


Sew together each row separately, i.e. the top 3 squares, then the middle 3, then the bottom 3, all as separate rows.  Next, stack your rows on top of each other-- this makes cutting easier. 

You're going to measure two inches from the outer edge of the outer squares and cut these pieces off: 


Do this on both sides of the rows. Now you'll sew together the center section. You'll also sew together the outer 2" pieces you cut, as they would have appeared on the original 9-square block. Lay out all your pieces once they're sewn to make sure everything lines up.


Now choose 8 strips, four1.25" x 7.5", and four1.25" x 8". You'll set aside the 8" strips for later, but choose coordinating colors. Sew together two of the 7.5" strips into one long strip. Repeat with the other two strips. Set them into the block.


Sew the outer 2" pieces together with the strips, then sew the strips into the center block. You should have one solid block when you're done.
Now, repeat the cutting process, except this time you'll cut perpendicular to the strips in the block. Now it's also time to sew together the 8" pieces into long strips, coordinating with the strips in the block.


Sew together all the pieces, making sure each corner coordinates. When you're done, you'll have a 9-square block with a square criss-cross corner pattern. You can either place the blocks directly together in your quilt, or place them each within their own bordered section of the quilt, however you wish! If they're bordered you'll need fewer blocks to achieve your desired size, so be sure to figure out how much fabric you'll need.


---------

I plan to save my quilt until I live in my first real house, as a rather literal house-warming gift to myself.

Friday, January 20, 2012

Trying to Save More Cows

About a month ago I started thinking seriously about seeking out vegetarian recipes I could try that would be easy and delicious and filling. Ideally I'd like to be eating one day of meat-free meals each week. More specifically, I'd like to have one meat-free day, and one fish-only day.

There are obvious health benefits to reducing the meat and upping the veggies:
1. Getting over my fear of various vegetables
2. Reducing cholesterol
3. Reducing fat intake
4. Increasing fiber and vitamin intake
5. Saving the baby cows, baby chicks, baby piglets and various other animals from certain horrible death.

SO! Here is the first vegetarian recipe I found-- I tried it out last night and I think it's certainly a keeper! Very inexpensive, and extremely delicious.

Spinach and Mushroom Lasagna


Half a package (1 lb) of whole grain lasagna noodles (save the other half for another time)
1 package (2.5 lbs) of frozen chopped spinach
1 1/2 lbs. fresh mushrooms, cut into 1-inch pieces
2 tbsp butter
1 tbsp olive oil
2 cloves garlic
4 tbsp red wine vinegar
1 tbsp honey
1 small tub ricotta cheese
1 cup shredded mozzarella cheese


1. First, get the water boiling for noodles. Everything else can be done while the water heats up and the noodles cook. Just cook according to package instructions and drain into a collander. Drizzle with olive oil to keep from sticking.
2. In a large skillet melt 1 Tbsp butter over medium heat. Once it's melted, add 2 cloves of smashed & minced garlic. When the garlic is golden brown, pour the package of spinach into the skillet. Cook until completely wilted.
3. When spinach is cooked, empty the skillet into a medium/large mixing bowl.
4. In the same skillet, add the other Tbsp of butter and Tbsp olive oil and mix until melted. Pour in the mushrooms and cook until soft, about 10 minutes. Once soft, add vinegar and honey. This will add flavor and the honey will keep the sharpness of the vinegar in check. Deglaze the pan and cook for another minute. Drain off excess liquid and pour mushrooms into the same bowl as the spinach.
5. Add ricotta cheese to bowl and mix all the veggies together with the cheese.
6. When noodles are ready to assemble, spray a 9 x 13 inch baking pan with non-stick spray.
7. Begin assembling lasagna: start with a layer of noodles, then a layer of the spinach-cheese mixture. Repeat until all ingredients are used up. Finish by topping the lasagna with the mozzarella cheese.
8. Bake for 20 minutes at 350.

You can make this lasagna ahead and keep it covered well in the refrigerator for up to 2 days, then bake it when you're ready.

Sunday, January 15, 2012

Roasted Honey Mustard Salmon

This recipe is extremely delicious and extremely easy. I made it tonight and it definitely got 2 thumbs up. This one is going on the regular rotation-- it's quick and healthy!

You'll need:

 
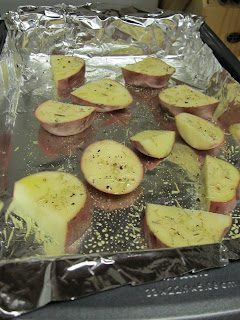
2-3 small new potatoes, halved
1 Tbsp rosemary
2 Tbsp olive oil
salt and pepper
2 salmon filets (add more as needed)
2 Tbsp whole-grain mustard (I used spicy brown)
1 Tbsp red wine vinegar
2 tsp honey
 

First, heat the oven to 425 degrees.Place a sheet of foil on your baking sheet (it makes clean-up super easy). Toss the potatoes with the rosemary, 1 Tbsp olive oil, and a little salt and pepper, then place them on the baking sheet. Roast for 15 minutes.


Next, season the salmon with some salt and pepper. Pull the baking sheet out of the oven and flip the potatoes, then push them to the side. Place the salmon in the center. Roast until the salmon is opaque throughout, about 10-12 minutes.


Now in a small bowl, whisk the mustard, vinegar, honey 1 Tbsp olive oil and a dash of salt and pepper.


Pull the baking sheet once the fish is done and transfer the potatoes to a bowl. Toss with 1 Tbsp of the vinaigrette and serve alongside the salmon. Pour the remaining vinaigrette over the salmon and enjoy!


(We served with broccoli and a glass of cabernet sauvignon.)

I hope you like this recipe and I hope you share it with your friends!