Sunday, February 5, 2012

Pajamas and Pinterest

I am in love with an airline pilot.

That being said, I spend a lot of time hanging out alone, which is fine with me because I tend to be a huge homebody. Don't get me wrong, I still get dressed and bathe regularly and I have my friends, but I'm perfectly content to hang out at home for 3 days straight. My point is this: once all the reading, the writing and the research is done (the 3 "r"s of higher education!) I have a bit of time on my hands.

Enter: timesuck Pinterest

This website has changed my life. Not in a Celine Dion kind of way-- who! by the way, you can look up and pin on Pinterest! But it has provided me with yet another creative outlet. I have my old lady magazines, my old lady hobbies, and my new interest in cooking, and these things keep me going most of the time. But there's something about having a living, breathing community to share ideas with that is new and exciting. On Pinterest, I can follow my friends and get to know their creative sides. A lot of these friends are people that I wouldn't normally discuss crafts/hobbies/recipes, etc. with because I don't really know what they're into. But now I have an idea and a ready conversation topic. It's pretty cool.

It's also incredibly fun to search for new recipes to try here at home, and to pin ideas and crafts for events like birthdays, baby showers, and weddings, things which usually rise in frequency in one's mid-20s. There are ideas for gardening, ideas for home decoration, and ideas for clothing and apparel that are not only cute, but are sometimes invented and displayed by other normal, everyday people, rather than magazine models. That element of reality is so much more inspiring because I feel that all the cool ideas I see are not manufactured, but real, which means I can try them, too!

Anyway, this is a completely pointless post, and super dorky. But if you haven't already, check out Pinterest. It's very fun and it's a way to brainstorm for yourself, and brainstorm with others. AND. You can do it in your pajamas, as I do 85% of the time. Holler.

Monday, January 23, 2012

Comfort in Stitches

Lately I've been assembling some quilt blocks, working towards a colorful, warm, unique quilt. Each block takes quite a bit of time and precision, and I'd like to share the joy, for those of you interested!

The pattern I adopted and amended originally makes one full-size quilt, from 81 squares (5” x 5”). I'm making a quilt large enough to fit a queen size bed with plenty left over.

You'll need 81 (or more) squares, cut 5”x5”.
You'll also need plenty of strips, cut 1.25” x 7.5”, as well as 1.25” x 8”.
Start by setting up your first 9-square block:


Sew together each row separately, i.e. the top 3 squares, then the middle 3, then the bottom 3, all as separate rows.  Next, stack your rows on top of each other-- this makes cutting easier. 

You're going to measure two inches from the outer edge of the outer squares and cut these pieces off: 


Do this on both sides of the rows. Now you'll sew together the center section. You'll also sew together the outer 2" pieces you cut, as they would have appeared on the original 9-square block. Lay out all your pieces once they're sewn to make sure everything lines up.


Now choose 8 strips, four1.25" x 7.5", and four1.25" x 8". You'll set aside the 8" strips for later, but choose coordinating colors. Sew together two of the 7.5" strips into one long strip. Repeat with the other two strips. Set them into the block.


Sew the outer 2" pieces together with the strips, then sew the strips into the center block. You should have one solid block when you're done.
Now, repeat the cutting process, except this time you'll cut perpendicular to the strips in the block. Now it's also time to sew together the 8" pieces into long strips, coordinating with the strips in the block.


Sew together all the pieces, making sure each corner coordinates. When you're done, you'll have a 9-square block with a square criss-cross corner pattern. You can either place the blocks directly together in your quilt, or place them each within their own bordered section of the quilt, however you wish! If they're bordered you'll need fewer blocks to achieve your desired size, so be sure to figure out how much fabric you'll need.


---------

I plan to save my quilt until I live in my first real house, as a rather literal house-warming gift to myself.

Friday, January 20, 2012

Trying to Save More Cows

About a month ago I started thinking seriously about seeking out vegetarian recipes I could try that would be easy and delicious and filling. Ideally I'd like to be eating one day of meat-free meals each week. More specifically, I'd like to have one meat-free day, and one fish-only day.

There are obvious health benefits to reducing the meat and upping the veggies:
1. Getting over my fear of various vegetables
2. Reducing cholesterol
3. Reducing fat intake
4. Increasing fiber and vitamin intake
5. Saving the baby cows, baby chicks, baby piglets and various other animals from certain horrible death.

SO! Here is the first vegetarian recipe I found-- I tried it out last night and I think it's certainly a keeper! Very inexpensive, and extremely delicious.

Spinach and Mushroom Lasagna


Half a package (1 lb) of whole grain lasagna noodles (save the other half for another time)
1 package (2.5 lbs) of frozen chopped spinach
1 1/2 lbs. fresh mushrooms, cut into 1-inch pieces
2 tbsp butter
1 tbsp olive oil
2 cloves garlic
4 tbsp red wine vinegar
1 tbsp honey
1 small tub ricotta cheese
1 cup shredded mozzarella cheese


1. First, get the water boiling for noodles. Everything else can be done while the water heats up and the noodles cook. Just cook according to package instructions and drain into a collander. Drizzle with olive oil to keep from sticking.
2. In a large skillet melt 1 Tbsp butter over medium heat. Once it's melted, add 2 cloves of smashed & minced garlic. When the garlic is golden brown, pour the package of spinach into the skillet. Cook until completely wilted.
3. When spinach is cooked, empty the skillet into a medium/large mixing bowl.
4. In the same skillet, add the other Tbsp of butter and Tbsp olive oil and mix until melted. Pour in the mushrooms and cook until soft, about 10 minutes. Once soft, add vinegar and honey. This will add flavor and the honey will keep the sharpness of the vinegar in check. Deglaze the pan and cook for another minute. Drain off excess liquid and pour mushrooms into the same bowl as the spinach.
5. Add ricotta cheese to bowl and mix all the veggies together with the cheese.
6. When noodles are ready to assemble, spray a 9 x 13 inch baking pan with non-stick spray.
7. Begin assembling lasagna: start with a layer of noodles, then a layer of the spinach-cheese mixture. Repeat until all ingredients are used up. Finish by topping the lasagna with the mozzarella cheese.
8. Bake for 20 minutes at 350.

You can make this lasagna ahead and keep it covered well in the refrigerator for up to 2 days, then bake it when you're ready.

Sunday, January 15, 2012

Roasted Honey Mustard Salmon

This recipe is extremely delicious and extremely easy. I made it tonight and it definitely got 2 thumbs up. This one is going on the regular rotation-- it's quick and healthy!

You'll need:

 
2-3 small new potatoes, halved
1 Tbsp rosemary
2 Tbsp olive oil
salt and pepper
2 salmon filets (add more as needed)
2 Tbsp whole-grain mustard (I used spicy brown)
1 Tbsp red wine vinegar
2 tsp honey
 

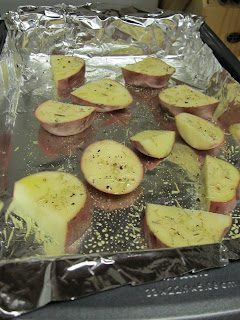
First, heat the oven to 425 degrees.Place a sheet of foil on your baking sheet (it makes clean-up super easy). Toss the potatoes with the rosemary, 1 Tbsp olive oil, and a little salt and pepper, then place them on the baking sheet. Roast for 15 minutes.


Next, season the salmon with some salt and pepper. Pull the baking sheet out of the oven and flip the potatoes, then push them to the side. Place the salmon in the center. Roast until the salmon is opaque throughout, about 10-12 minutes.


Now in a small bowl, whisk the mustard, vinegar, honey 1 Tbsp olive oil and a dash of salt and pepper.


Pull the baking sheet once the fish is done and transfer the potatoes to a bowl. Toss with 1 Tbsp of the vinaigrette and serve alongside the salmon. Pour the remaining vinaigrette over the salmon and enjoy!


(We served with broccoli and a glass of cabernet sauvignon.)

I hope you like this recipe and I hope you share it with your friends!

Thursday, December 22, 2011

3 or 4 Days of Christmas

12 days of Christmas. At first that sounds like a great idea-- 12 days of celebrating, feasting, opening gifts, and enjoying the fun and relaxation that comes when that holiday finally arrives!

But then you quickly realize that it also means 12 days of bloated stomachs after overeating, cleaning up mounds of gift wrap, and defusing arguments which inevitably ensue when families get together for an extended period of time.

So here is my solution: how about 3 or 4 days of Christmas, depending on how much fa-la-la-la-ing you can handle?

You see, last night I spent about 45 minutes dropping extremely heavy (we're talking mercury-density here) hints that I wanted to be allowed to open 1 gift in celebration of Christmas. I was immediately joined by my siblings on this crusade  mission, and was immediately shut down by my parents. However, after 45 minutes of logical reasoning, quippy jokes, and blatant begging we finally broke 'em! We were allowed to open 1 gift. And it was absolutely wonderful. The entire ordeal (if we include the badgering persuading) took about 1 hour, and cleanup was over in about 3 minutes. We all talked about our gifts and spent some time together in the living room, then went our separate ways for the rest of the night. It was very fun and very stress-free. Hence, day 1 of Christmas.

I'm looking forward to the next 3 or 4 days of Christmas.

Day 2: Eric gets in to Dallas tonight and will, at some point during his visit, open his gift from my parents and they'll open their gift from him. I'm making a big dinner tomorrow night (spicy shredded pork, scotch potatoes, and macaroni and cheese) and we'll have a great time! So little muss, so little fuss. Thus we have day 2.

Days 3 and 4 are Christmas Eve and Christmas Day. On Christmas Eve my brother and sister and I will open our stockings, and Annie will open the pets' stockings (yes, we're those people). We'll take pictures and get all the wrappings cleaned up and spend the rest of the night hanging out together. Finally on Christmas Day we'll spend the morning having a family breakfast, opening all the gifts and lounging around the house. Then we'll head over to my aunt's house and have Christmas with our family and enjoy a traditional Cuban Christmas meal! We'll open gifts with the cousins and grandparents and eat way too much. When we finally make it home we'll probably just end up collapsing on the nearest flat surface, but it will be a merry collapse.

Days 1-4 look to be full of food and gifts and family, without all the bloating and the fighting and the drowning in gift wrap. With a 2-month build up to Christmas, it's hard to just celebrate for one day. 3 or 4 days is a nice term limit. After all, everything is better in moderation.

Saturday, December 10, 2011

Websites I'd Marry For The Money

If I could marry a website, I definitely wouldn't. If I could marry a website that was easy money, I definitely would!

"Crazy lady, what are you talking about???"

Well, my dear anonymous voice, I'm talking about my favorite websites I use to earn a little extra dough! It's all legal, of course. I've been a member at each for at least a year, and if I had to estimate, I'd say that in one year, I've earned about $150 in gift cards and rewards. That's $150 of extra dinners out, magazine subscriptions, and groceries. Every single site is free, and you can unsubscribe at any time. I wouldn't steer you wrong!

 Here is my list:

1. PollingPoint.com
This is a survey site. Once you sign up you can elect to receive surveys up to every day, or as rarely as once a month. Each completed survey is worth a certain number of points, which can be saved up and then redeemed for prizes such as gift cards, movie tickets, or even cash. These surveys are pretty unique, in that the formatting and type is very user-friendly and it varies enough to keep the surveys from being monotonous. I just earned an Olive Garden/Red Lobster gift card from this site.

2. E-Rewards.com
This survey site has a lot of different rewards, including magazine subscriptions, gift cards, and airline miles. The cool thing about this site is that they provide you with partial credit even if you don't qualify to complete an entire survey. They also have quick surveys that only take 1 minute. You earn "e-rewards cash" which can be traded in for rewards. The email containing the link to the survey also tells you the topic and the estimated time, so that you can choose to accept or decline, depending on how much time you've got.

3. MyPoints.com
This is my favorite. MyPoints gives you 10 points for every survey you start but don't qualify for, and between 50-250 points for every completed survey. They also send you emails with offers from companies. When you "click thru" to the companies' websites, you get 5 points--just for clicking. And you don't have to buy or commit to anything just because you clicked. To be honest, I click through and immediately close the new tab, and I still get points. It's called Bonus Mail. MyPoints also offers Video Rewards, in which you watch an advertisement, enter some information to prove you watched the whole thing, and you get points. Lastly, you can do all your online shopping through MyPoints. They have coupon codes and links to pretty much every retailer's website, and by clicking the link on the MyPoints website, your purchase gives you a certain number of points for every dollar you spend. So not only do you get coupon codes and your online purchase, but you get extra points, just for doing the shopping you were already doing. The points can be traded in for all kinds of gift cards and even donations.

There you have it! These are my favorite websites for earning a little extra. Check them out!

Friday, December 2, 2011

I Got A Bit Camera-Happy This Time...

Tonight I tried a new recipe, one that is inevitably associated with comfort food, old-fashioned dinners, and Boston Market. Tonight I made chicken potpie.

Eric has mentioned several times that he likes potpies, and in my most recent search for new recipes, I stumbled upon a few variations of this dish. I settled on 2 recipes to try. At first I was pretty intimidated by the idea of the pastry topping, but I decided to make my own topping. After a very messy and complicated blender incident, I was able to assemble my pastry dough for this dish, but keep in mind that store-bought pastry dough is just as good and will most likely be less messy and stressful if you're just beginning to explore this area of cooking.

For this chicken potpie (makes 4) recipe you'll need:

1 tbsp olive oil
½ medium onion, chopped
4 ounces cremini mushrooms, quartered
2 medium carrots, peeled and thinly sliced
1 celery stalk, thinly sliced
salt and pepper
¼ cup all-purpose flour
1 ½ cups chicken stock
2 chicken breasts
3 tbsp heavy cream or whole milk
enough pastry dough to cover 4 6-inch ramekins
flour for the surface
1 egg lightly beaten for egg wash


First heat up your olive oil in a large skillet. Add the onion and cook until it's softened and translucent, about 8 minutes. Add the mushrooms, carrots, and celery and cook another 8-10 minutes until soft. Add some more olive oil if you find that the veggies are cooking too quickly. Season with salt and pepper. Stir in the flour.


Next, add the stock and bring to a simmer. Cook until the whole thing has thickened, about 5 minutes. Add the chicken and the cream/milk and simmer until the chicken is cooked through, another 5 minutes or so.


Divide the filling among 4 ramekins (you can also use 2 regular oven-safe bowls).


Preheat the oven to 375. Roll out your pastry dough to ¼-inch thickness on a floured surface. Cut out 4 circles which are an inch larger than your ramekins (or bowls). Place them on the ramekins and crimp the edges to seal. Brush the dough with egg wash (this will help the crust get golden and flaky, so be generous!) and freeze for 20 minutes.


Bake until the toppings are golden and fillings are bubbling, about 40 minutes.


Brag and enjoy! (It's what I always do...)